Discover the simple steps to grilling frozen chicken perfectly for a delicious and juicy meal every time.
Who says you can’t have a delicious grilled chicken dinner when your poultry is still frozen solid? With the right technique and a bit of patience, grilling frozen chicken can be just as easy and flavorful as cooking it fresh. Whether you’re short on time or forgot to thaw your meat ahead of schedule, this guide will teach you everything you need to know about grilling frozen chicken like a pro.
So fire up the grill, grab your tongs, and let’s get started!
Can You Grill Chicken From Frozen?
Grilling frozen chicken is a topic that has sparked many debates among grill enthusiasts. Some say it’s impossible to get juicy and flavorful meat from frozen poultry, while others swear by the technique.
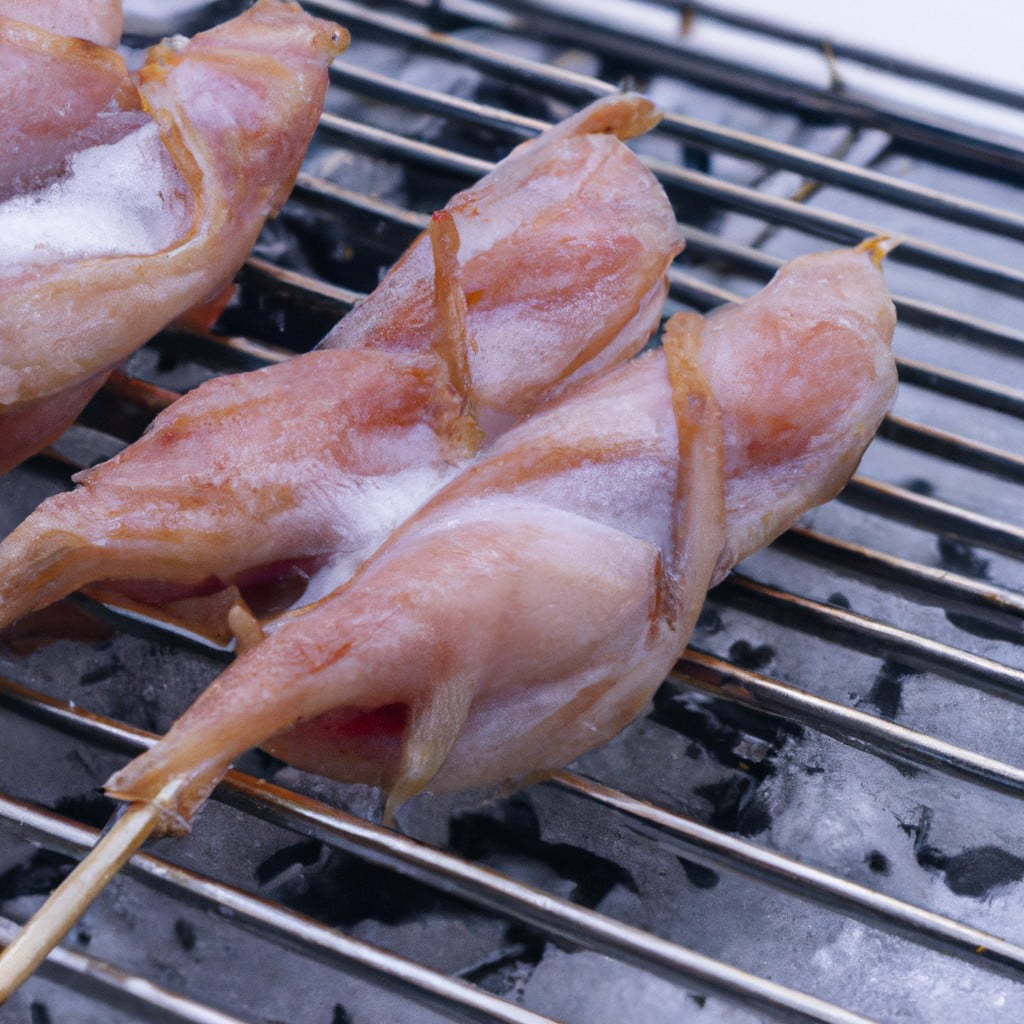
The truth is, you can grill chicken straight from the freezer with great results if you follow some simple steps.
Firstly, make sure your chicken is not stuck together in one big clump; separate each piece before grilling. Secondly, use high heat to cook your frozen chicken thoroughly without drying it out or leaving any raw spots inside.
It’s important to note that cooking times will be longer than for fresh or thawed meat since the center of the bird takes longer to reach a safe temperature when starting at freezing temperatures.
Thawing Frozen Chicken
While it may be tempting to leave your chicken on the counter or in warm water for a quick defrost, these methods can lead to bacterial growth and foodborne illness.
The best way to thaw frozen chicken is by placing it in the refrigerator overnight. This method allows for slow and even defrosting while keeping your meat at a safe temperature.
If you’re short on time, you can also use cold water immersion or a microwave with a defrost setting.
When using cold water immersion, place your sealed chicken in a bowl of cold tap water and change out the water every 30 minutes until fully thawed. For microwaving, follow your appliance’s instructions carefully as cooking times vary based on wattage and weight.
What’s the Best Way to Defrost a Chicken?
Defrosting your chicken the right way will ensure that it cooks evenly and stays juicy on the inside. The best way to defrost a whole chicken is in the refrigerator, which allows for slow and even thawing while keeping bacteria growth at bay.
To do this, simply place your frozen chicken in a large bowl or dish and cover with plastic wrap before placing it in the fridge overnight. If you’re short on time or forgot to plan ahead, another option is using cold water immersion method by submerging your sealed package of frozen meat into cold water until fully thawed.
Avoid using hot water as this can cause uneven cooking due to partial cooking during defrosting process leading up bacterial growth if not cooked immediately after.
Can You Defrost a Whole Chicken in a Microwave?
While there are several methods to defrost chicken, using a microwave is one of the quickest and most convenient ways to do so. However, when it comes to defrosting a whole chicken in the microwave, things can get tricky.
Firstly, you need to make sure that your microwave has a “defrost” setting as this will help prevent uneven cooking or partially cooked areas on your bird. Secondly, you should remove any packaging from around the bird before placing it into your microwavable dish.
It’s important not to leave your whole chicken out at room temperature for too long before putting it into the microwave as this could lead to bacterial growth and food poisoning risks.
Once placed inside of its container with some water added (to help conduct heat), set up time according weight guidelines provided by manufacturer or recipe instructions if available.
What’s the Best Way to Tell If a Chicken Is Defrosted?
How can you tell if it’s ready? One of the easiest ways to check if a chicken is defrosted is by pressing on its flesh. If the meat feels firm and there are no ice crystals present, then it has thawed completely.
Another way to test for doneness is by inserting a meat thermometer into the thickest part of the bird; when its temperature reads 165°F (74°C), then you know that your chicken has been safely cooked through and ready for consumption.
However, be careful not to leave your frozen poultry out at room temperature for too long as this can lead to bacterial growth and foodborne illnesses.
Preparing the Grill
First, clean the grates with a wire brush and remove any debris or leftover food from previous meals. Next, oil the grates using a paper towel dipped in vegetable oil to prevent sticking.
If you’re using charcoal for your grill, make sure that it’s fully lit and has turned white before adding your chicken. For gas grills, preheat on high for 10-15 minutes before reducing heat to medium-high.
It’s also important to consider indirect heat when preparing your grill for frozen chicken. Indirect heat means that one side of the grill is heated while leaving another side unheated or at low temperature levels; this allows you more control over cooking times and temperatures without burning or drying out meat too quickly.
Step 2: Preheat Your Grill
This step is crucial because it ensures that the cooking surface reaches the right temperature and helps prevent sticking.
To preheat your grill, turn all burners on high and close the lid for about 10-15 minutes. If you’re using a charcoal grill, light up enough coals to cover one side of the grate and let them heat up until they are covered in white ash before spreading them out evenly.
While waiting for your grill to heat up, take this time to prepare any additional ingredients or seasonings that you plan on using with your chicken.
Equipment
You’ll need a reliable grill with a lid that can maintain consistent heat levels and provide enough space for your chicken pieces. A pair of long-handled tongs will also come in handy for flipping and moving the meat around without burning yourself.
In addition to these basics, you may want to invest in some additional tools like a meat thermometer or instant-read thermometer to ensure that your chicken is cooked all the way through. A basting brush can be useful if you plan on using marinades or sauces during cooking.
It’s important not only to have good quality equipment but also keep them clean and well-maintained so they last longer. Before each use, make sure your grill grates are clean by brushing off any debris from previous cookouts with a wire brush or scraper tool.
Handling Cross-Contamination
Since the meat is still frozen, there’s a higher risk of bacteria spreading from the surface to other areas of your grill or cooking utensils. To prevent this from happening, make sure you handle your chicken with care and keep it separate from other foods.
Before handling any food items on your grill, be sure to wash your hands thoroughly with soap and water for at least 20 seconds. Use separate cutting boards and utensils for raw meats like chicken so that they don’t come into contact with ready-to-eat foods like vegetables or fruits.
Avoid using marinades that have been in contact with raw poultry as dipping sauces during mealtime since these can also spread harmful bacteria around.
Marinating the Chicken
Marinating adds flavor and moisture to the meat, making it more tender and juicy. You can use any marinade you like, but keep in mind that acidic marinades can break down the proteins in chicken if left too long.
To marinate your chicken properly:
- Choose a non-reactive container: Use a glass or plastic container for marinating as metal containers may react with acidic ingredients.
- Add Marinade: Pour enough marinade into the container to cover all of your pieces of chicken.
- Mix well: Make sure each piece is coated evenly with marinade by mixing them around gently.
- Cover & Refrigerate: Cover tightly with plastic wrap or lid and refrigerate for at least 30 minutes up to overnight.
When you’re ready to grill, remove the chicken from its marinade and discard any excess liquid before placing on preheated grates over direct heat according to recipe instructions.
Ingredients
While some may prefer a simple salt and pepper seasoning, others may opt for a more complex marinade or rub. Regardless of your preference, it’s important to choose high-quality ingredients that will enhance the natural flavors of your chicken.
If you’re using a marinade or rub, be sure to read through the recipe carefully before starting. Some recipes may call for specific types of herbs or spices that are essential for achieving optimal flavor.
In addition to seasonings and spices, consider adding fresh herbs like rosemary or thyme for an extra burst of freshness. And don’t forget about oil! A light coating of olive oil can help prevent sticking while also adding moisture and richness to your grilled chicken.
Pre-Grill Seasoning
Pre-grill seasoning is a crucial step that can make all the difference in the flavor of your final dish. The good news is that seasoning frozen chicken isn’t much different from seasoning fresh chicken.
To add some extra flavor to your grilled chicken, consider using a dry rub or marinade before cooking. A dry rub typically consists of spices and herbs mixed together and rubbed onto the surface of the meat, while a marinade involves soaking the meat in a flavorful liquid for several hours before grilling.
When choosing ingredients for your pre-grill seasoning, keep in mind what flavors will complement or enhance those already present in frozen chicken. For example, garlic powder and paprika are great additions to any poultry-based spice blend because they bring out natural savory notes without overpowering other flavors.
Remember not to overdo it with salt as this can cause moisture loss during cooking resulting in tough meat texture.
Step 1: Pat the Chicken Dry With a Paper Towel
This step is crucial because any excess moisture on the surface of the chicken can cause steam to form when placed on the grill, which will prevent those beautiful grill marks from forming and may even result in uneven cooking.
To ensure that your frozen chicken cooks evenly and has a crispy exterior, take a few extra seconds to thoroughly pat each piece dry with paper towels before seasoning or marinating them.
Grilling Techniques
To ensure that your chicken cooks evenly and stays juicy, it’s important to use the right grilling techniques. Start by placing the frozen chicken directly on the grill over medium-high heat for about 5-7 minutes per side to sear in those delicious flavors.
Once you’ve achieved those beautiful grill marks, move your chicken to indirect heat and continue cooking until it reaches an internal temperature of 165°F (74°C). This will take approximately another 20-30 minutes depending on how thick your cuts are.
If you’re using bone-in pieces or larger cuts of meat, consider covering them with foil during part of the cooking process to help retain moisture and prevent burning. And remember not to flip too often as this can cause sticking or tearing.
Step 3: Place the Chicken Over Direct Heat and Cook
Place the frozen chicken directly on the hot grates over medium-high heat. Make sure that you’re cooking with direct heat, which means that there are no coals or burners turned off under where you place your meat.
Cooking times will vary depending on how thick your cuts of chicken are and what type of grill you’re using. As a general rule, boneless skinless breasts will take about 20-25 minutes to cook through while bone-in pieces may take up to an hour.
It’s important not to move or flip the chicken too often as this can cause it to stick and tear apart. Instead, let each side sear for a few minutes before flipping once until both sides have developed those beautiful charred grill marks we all love.
Remember: don’t be tempted by shortcuts like microwaving or boiling frozen meat before grilling! These methods can lead to unevenly cooked poultry and even foodborne illness if not done properly.
Grill Marks & Searing
Did you know that grill marks aren’t just for show? They actually serve a purpose in creating a delicious sear on your chicken, which locks in moisture and adds flavor.
To achieve perfect grill marks, make sure to preheat your grill properly and oil the grates before placing the chicken down. Once you’ve placed it over direct heat, resist the urge to move it around too much – this will disrupt those coveted lines! Instead, let it cook for a few minutes until you see clear markings before flipping.
Searing is another important technique when cooking frozen chicken on the grill. This involves cooking at high temperatures initially to create that crispy outer layer while keeping juices locked inside.
To get an even sear across all sides of your chicken breasts or thighs, use tongs to rotate them every minute or so until they’re cooked through.
Temperature Checks
One of the best ways to do this is by using a meat thermometer. Inserting a thermometer into the thickest part of your chicken will give you an accurate reading of its internal temperature.
The USDA recommends cooking poultry to an internal temperature of 165°F (74°C) for safe consumption. When grilling frozen chicken, it’s important not only to check its internal temperature but also how evenly it has been cooked throughout.
To avoid overcooking or undercooking your bird, use a digital instant-read thermometer and take multiple readings from different parts before removing from heat source.
Step 4: Check the Internal Temperature
The best way to do this is by using a meat thermometer to check its internal temperature. Inserting a thermometer into the thickest part of your chicken will give you an accurate reading of how well it has been cooked.
The USDA recommends cooking poultry until it reaches an internal temperature of 165°F (74°C). This ensures that any harmful bacteria present in raw or undercooked chicken are destroyed and makes sure your meal is safe for consumption.
To get an accurate reading, insert your thermometer into several parts of each piece of chicken as they may cook unevenly due to their size and shape. Once you’ve confirmed that all pieces have reached at least 165°F (74°C), remove them from heat and let them rest for five minutes before serving.
Cook Time Considerations
This is because the frozen meat needs more time to defrost and cook through. As a general rule of thumb, plan on adding an extra 50% of your usual cooking time when grilling frozen chicken.
To ensure that your grilled chicken is cooked all the way through, use a meat thermometer to check its internal temperature. The USDA recommends cooking poultry until it reaches an internal temperature of 165°F (74°C).
Insert the thermometer into the thickest part of each piece without touching bone or grill grate.
Remember not to rush things by turning up your heat too high as this can lead to unevenly cooked and dry-out pieces. Instead, maintain a consistent medium-high heat throughout for even results.
Resting Period
This resting period allows the juices in the meat to redistribute and settle, resulting in a more tender and flavorful final product. To rest your grilled chicken, simply remove it from the heat source and place it on a clean plate or cutting board.
Tent loosely with foil or another piece of parchment paper for about 5-10 minutes before slicing into portions.
During this time, you can prepare any sides that will accompany your meal or set up plates at the table. Once rested properly, slice into pieces against the grain (if applicable) and serve hot with your favorite dipping sauce.
Remember that patience is key when grilling frozen chicken – taking shortcuts may result in dry meat or uneven cooking temperatures! By following these simple steps including allowing ample resting time after cooking; you’ll be able to enjoy juicy grilled chicken every time without fail!
FAQ
Can you cook frozen chicken on a grill?
Yes, you can grill frozen chicken, but it requires 50% more time and proper technique to ensure it is safe to eat.
Can you cook chicken chicken from frozen?
Yes, you can cook chicken from frozen according to the USDA, but the cooking time will be about 50 percent longer, and it should not be cooked in a slow cooker or microwave.
How long to grill frozen chicken at 350?
To grill frozen chicken at 350°F, it typically takes 30-45 minutes, which is 50 percent longer than cooking unfrozen chicken.
What are the best techniques for grilling frozen chicken evenly?
The best techniques for grilling frozen chicken evenly include thawing it properly first, then cooking it at a medium heat to ensure even cooking throughout.
Are there any marinades or seasonings recommended for grilling frozen chicken?
Recommended marinades and seasonings for grilling frozen chicken include citrus-based marinades, barbecue sauce, and dry rubs with herbs and spices.
How can you ensure food safety when grilling chicken from frozen?
To ensure food safety when grilling chicken from frozen, cook it over medium heat until it reaches an internal temperature of 165°F (74°C).
Related
- How Long to Grill Chicken: Tips for Perfectly Cooked Poultry
- How to Grill Frozen Hot Dogs: Easy Steps for Tasty Results
- Grilled BBQ Chicken Breast: How to Perfectly Cook It at Home
- How Long to BBQ Chicken Thighs: Perfect Grilling Techniques and Tips
- Grilling Chicken Breast: Step-by-Step Guide for Juicy Results